If your stamped concrete patio or driveway looks faded or lets water soak right in, it’s time to reseal it.
Resealing stamped concrete keeps it looking sharp and shields it from stains, water, and sun damage. I’ve helped lots of folks around here get this right, and it’s simpler than you think. Stick with me, and I’ll walk you through how to reseal stamped concrete like a pro.
Key Takeaways
- Check for signs like water soaking in or faded color before resealing stamped concrete every 2-5 years.
- Clean thoroughly, repair cracks, and match your original sealer type for best results.
- Apply thin, even coats with a roller or sprayer, and let each one dry fully.
- DIY saves money, but pros ensure a flawless, long-lasting finish.
Signs Your Stamped Concrete Needs Resealing
Faded colors often signal it’s time to act. Water soaks in instead of beading up on the surface. Stains stick around after cleaning, or the shine is gone.
Rough spots or scratches show wear, too. High-traffic areas like patios fade faster from foot traffic and weather. Inspect yours yearly to catch it early.
How Often to Reseal Stamped Concrete
No set schedule fits every slab. Most stamped concrete needs resealing every 2-5 years, based on sealer type and use. Acrylic sealers on outdoor patios last about 2.5 years on average.
Heavy rain, sun, or freeze-thaw cycles speed up wear. Test with water, if it absorbs fast, plan to reseal soon. Overdoing it can cause peeling, so check first.
Choose the Right Sealer for Resealing
Match the original sealer to avoid problems. Stick with solvent-based if that’s what was used before, or water-based for easier cleanup. Solvent types hold up better outdoors against UV and weather.
Clear acrylic works well for most jobs and enhances color. Pick from a trusted brand with good coverage, around 400 square feet per gallon when resealing. Add non-slip grit if your surface gets slick when wet.
For more on custom stamped designs that stay protected longer, check our stamped concrete services in Arlington.
Gather Your Tools and Supplies
You’ll need a medium-bristle brush, paint roller with extension pole, and pump sprayer for even work. Grab gloves, goggles, and a respirator for safety. Mild soap, concrete cleaner, and crack filler round out the basics.
A garden hose or low-pressure washer helps with rinsing. Buy enough sealer for your space, figuring 200-400 square feet per gallon. Test compatibility on a small spot if unsure about the old sealer.
Step 1: Clean the Surface Well
Start with a good sweep to remove loose dirt. Mix mild soap and water, then scrub using a brush. Focus on textured patterns where grime hides.
Rinse with a hose, avoid high-pressure washers over 2,000 PSI to prevent damage. For tough buildup, use a surface cleaner attachment on low. Let it dry fully for 24 hours.
Step 2: Repair Cracks and Damage
Check for cracks along seams or from settling. Fill them with flexible caulk or stamped concrete patch made for textures. Smooth it to blend with the pattern.
This stops water from sneaking under and causing bigger issues. Let repairs cure as the product says, usually a few hours. Skip this, and your new sealer might fail fast.
Step 3: Prep for Better Adhesion
If the old sealer is flaking or you’re switching types, lightly sand with a black pad. Scrub stubborn spots with a neutral cleaner. Test on a corner first to avoid surprises.
For heavy wear, strip the old layer following the new sealer’s guide. A clean, dry surface is key. Dry weather helps here too.
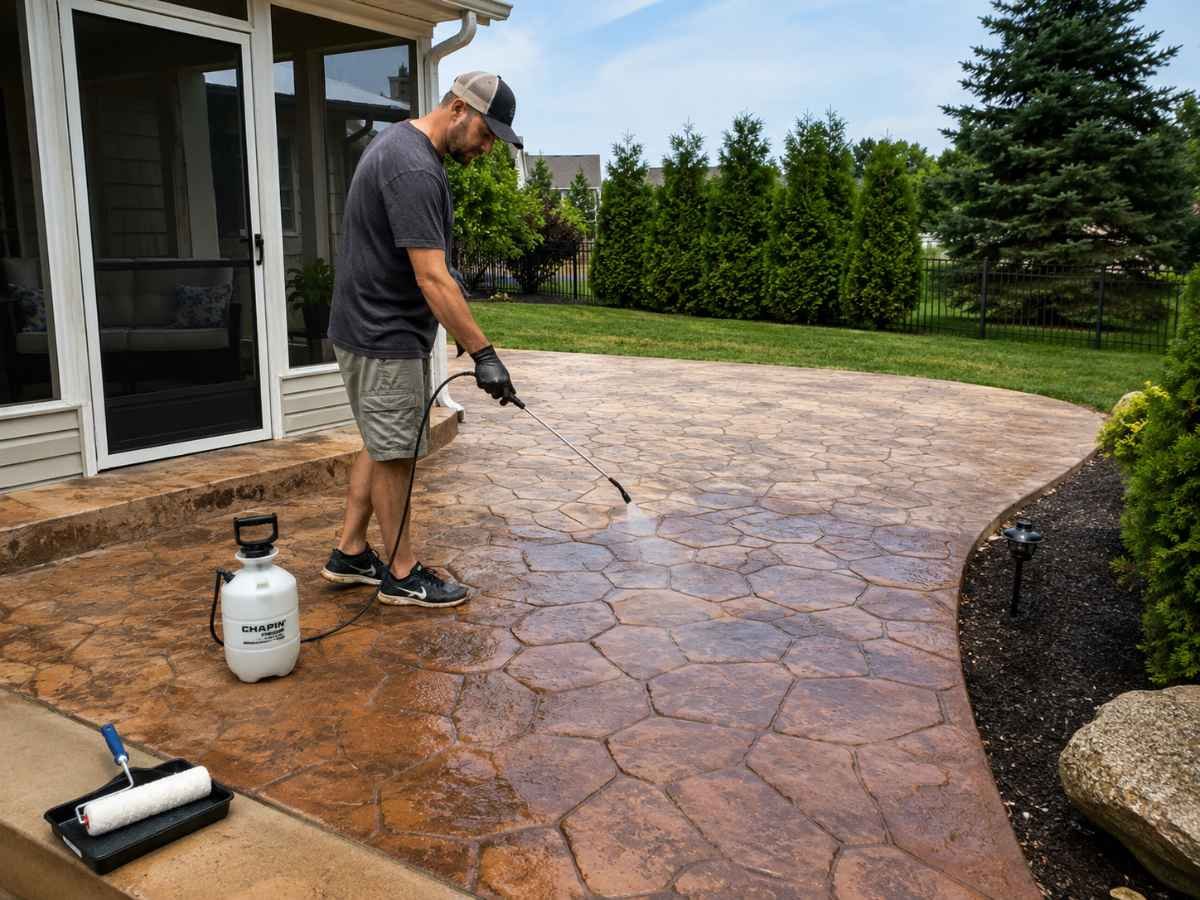
How to Apply Sealer to Stamped Concrete
Work on a dry day between 50 and 80 degrees Fahrenheit. Stir the sealer well, don’t shake to avoid bubbles. Start with edges using a brush.
Switch to a roller or sprayer for the main area. Apply thin coats in a crosshatch pattern for even coverage. Back-roll if spraying to smooth it out.
One solid coat often does the trick when resealing. Avoid puddles, they streak. Learn more application tips from our stamped concrete experts.
Apply the Second Coat if Needed
Wait 1-2 hours or as the label says for the first coat to tack up. Check for even sheen before recoating. Two thin coats beat one thick one.
Roll or spray perpendicular to the first pass. Keep it uniform across the whole surface. This boosts protection without buildup.
Drying Time and First Use
Foot traffic after 10-24 hours, depending on humidity. Wait 48-72 hours for vehicles or furniture. Full cure takes a week, so keep it clear.
Protect from rain with plastic sheeting if needed. Warmer, drier air speeds things up. Test a spot to confirm it’s ready.
Common Mistakes to Avoid
Skipping prep leads to peeling later. Thick coats cause yellowing or streaks. Always thin and even.
Wrong sealer type creates haze or poor stick. Mismatched products react badly. Read labels and test small.
Power washing too hard etches the texture. Use gentle methods. Rushing dry time traps moisture.
Safety Tips for DIY Resealing
Wear gloves, goggles, and a respirator, especially with solvent sealers. Work in open air to vent fumes. Cover nearby plants or grass.
Keep kids and pets away until dry. Have spill cleanup ready, like cat litter for drips. Follow all product warnings.
Cost to Reseal Stamped Concrete
DIY runs $0.20 to $0.75 per square foot for materials. A 500-square-foot patio might total $200 to $600, including sealer and tools.
Pros charge $1.50 to $4.00 per square foot installed. For that same patio, expect $1,000 to $2,500. Factors like size and condition affect the range.
When to Call a Professional
DIY works for light jobs, but pros handle tough prep and big areas best. They pick perfect sealers and avoid errors for longer life.
If your slab has heavy damage or unknown history, experts save headaches. Even coats mean no streaks or missed spots. Worth it for patios you love.
Maintenance After Resealing
Sweep or hose off dirt weekly. Use neutral cleaners for spots, no harsh acids. Reinspect every year for wear.
Avoid deicers or chemicals that eat sealer. Quick care keeps it fresh between reseals. Your stamped concrete will thank you.